Veeam Backup & Replication 9.0 Configuration and Management
Veeam Backup & Replication provides platform for backup, recovery and replication of virtualized applications and data.
Veeam Backup & Replication provides fast and reliable image-based backups for vSphere and Hyper-V virtual environments without using any tools, providing the ability to both achieve shorter backup windows and reduce backup and storage costs.
Veeam Backup & Replication gives you the ability to achieve low recovery time objectives (RTOs) of under 15 minutes, while allowing you to rely on virtually any recovery scenario by providing extremely fast and reliable restore of single files, entire VMs and application items.
It ensures the uninterrupted uptime of your business-critical applications by offering advanced, image-based VM replication and simplified disaster recovery. Veeam adds the ability to achieve a recovery time objective (RTO) of less than 15 minutes for ALL applications.
Veeam Backup & Replication v9.0 Backup Job Creation
We open the Veeam Backup & Replication v9.5 console.

We can add it from the Jobs tab in the BACKUP & REPLICATION section of the Veeam Backup & Replication v9.0 console.

You can start the Backup Job configuration process on Veeam Backup & Replication v9.0 by right-clicking Backup Job on the Jobs tab under the BACKUP & REPLICATION section in the Veeam Backup & Replication v9.0 console or clicking Backup Job under the Primary Jobs menu at the top.
On the Name screen, I usually configure the name of the server that I will buy backup by naming it weekly, monthly or yearly. You can also configure it this way if you wish. After completing the necessary configuration, we continue by saying Next.

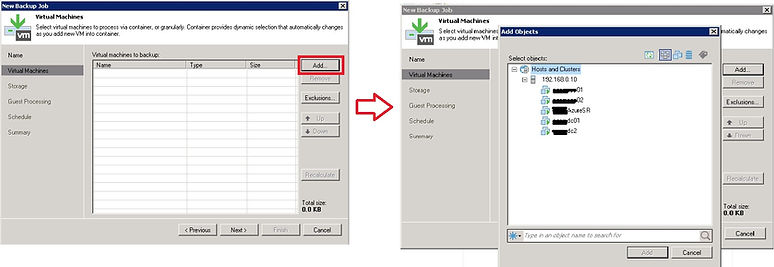
On the Virtual Machines screen, we click Add to add the Virtual Machine to which you will backup.
We add whichever virtual server we will backup from the Virtual Machine section and add it to our Backup Job by clicking Add.

I choose the server I want to be backed up and continue with Next.
In the Storage section, we choose the Advanced tab. The restore point to keep disk option comes as 14 by default. You can configure the value here according to the capacity of your disk size in your environment.

There are Reversed incremental (slower) and Incremental backup (recommended) types on the Advanced Settings screen.
Reversed incremental: The first Virtual Machine on Veeam Backup & Replication is taken as a full backup (.vbk) in the backup process. The next backup is taken as incremental (.vrb). Veeam Backup & Replication only backs up Data Blocks that have changed since the last backup. In each Reversed incremental backup operation, both incremental backups are taken as (.vrb) and full backup files taken as (.vbk) are updated. There is no need to take full backup periodically in the Backup configuration, which is reversed incrementally. In this backup type, there is no need to take full backups periodically.
Incremental: The first backup is full backup (.vbk). The next backups are incremental (.vib) and the changed parts are taken after the last full or incremental backup. If you choose the incremental backup, you will need to take a full backup periodically. To create Synthetic Full Backup, we tick the Enable Synthetic fulls (forever-incremental) box. With the Days button, we can determine the days to be full backup.

On the Choose Days screen, we set it as Saturday once a week.

After completing the necessary configuration on the storage screen, we continue by saying Next.
There are two options on the Guest Processing screen.
Enable application-aware image processing: If you want successful recovery of applications without any data loss, we need to tick this option.
Enable guest file system indexing: If you want files in the Virtual Machine to be indexed, you need to check this box. This indexing allows you to perform fast and accurate searches through Veeam Backup Enterprise Web UI.
After completing the necessary configuration on the Guest Processing screen, we continue by saying Next.

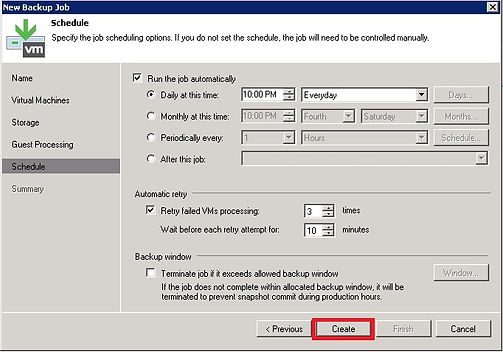
On the Schedule screen, we set the backup time. Below are some terms, if we summarize them briefly;
Daily at this time: Every day at a specific time, working days, at specified times on specified days of the week
Montly at this time: To take backups on the specified days of the specified months
Periodically every: For example, run it every 2 hours between 9.00 am and 18.00 pm
After this Job: In order for a job to start automatically after this job is finished,
Automatic Retry: If it fails for any reason, we can choose how many retries.
Backup Window: If the task is not completed within the specified hours, we can cancel it.

After completing the necessary configuration on the Schedule screen, we create Backup Jobs by saying Create.

There is a summary information of the settings we have made on the Summary screen. If we tick the Run the job when I click Finish box on the Summary screen, Backup Job will start automatically. We end the configuration by saying Finish.